
We're all heard of contouring and, thanks to the Kardashian clan, we have probably all tried it at one point or another. Aiming for a sleek and defined look, contouring done well gives those born without perfect cheekbones, a chiselled previously only dreamt about, and those with, a new depth to their face.
Contouring creates shadow, working to define such areas as the cheekbones, jawline and forehead, one of the most popular uses of contouring has been to make the nose area look slimmer and straighter.
At its best when used with matte products, the use of cream products; the go-to products for drag makeup, has been extraordinarily popular and most likely down to their ease of use.
As they say, all good things must come to an end, and contouring is no different. As popular as it is, and as well as it looks when done correctly, my clients are now looking for a brighter and fresher look, and contouring simply doesn't cut it.
Welcome to the stage, strobing. Simply, strobing is just highlighting, but highlighting with finesse. Super light, this look creates a youthful look while allowing the skin to breathe rather than pack clog up with excess product. I have clients who have told me it takes them almost an hour to contour, well now it will only take them 5 minutes to strobe!
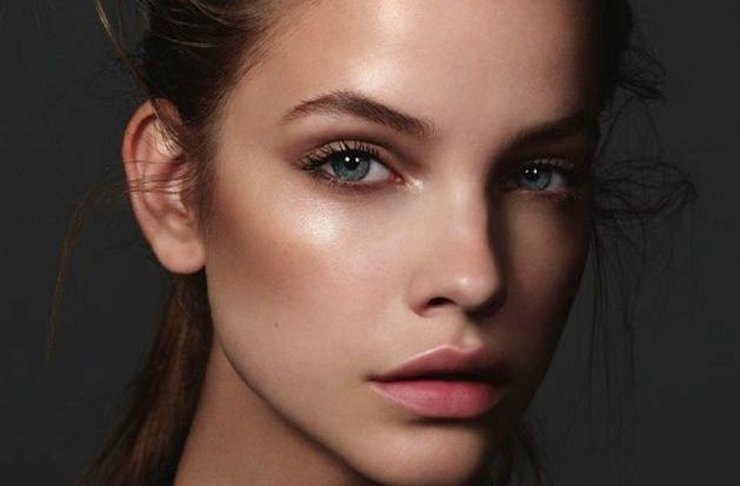
About the perfect glow, strobing creates a dewy finish to the skin and, for me, that has always been in fashion.
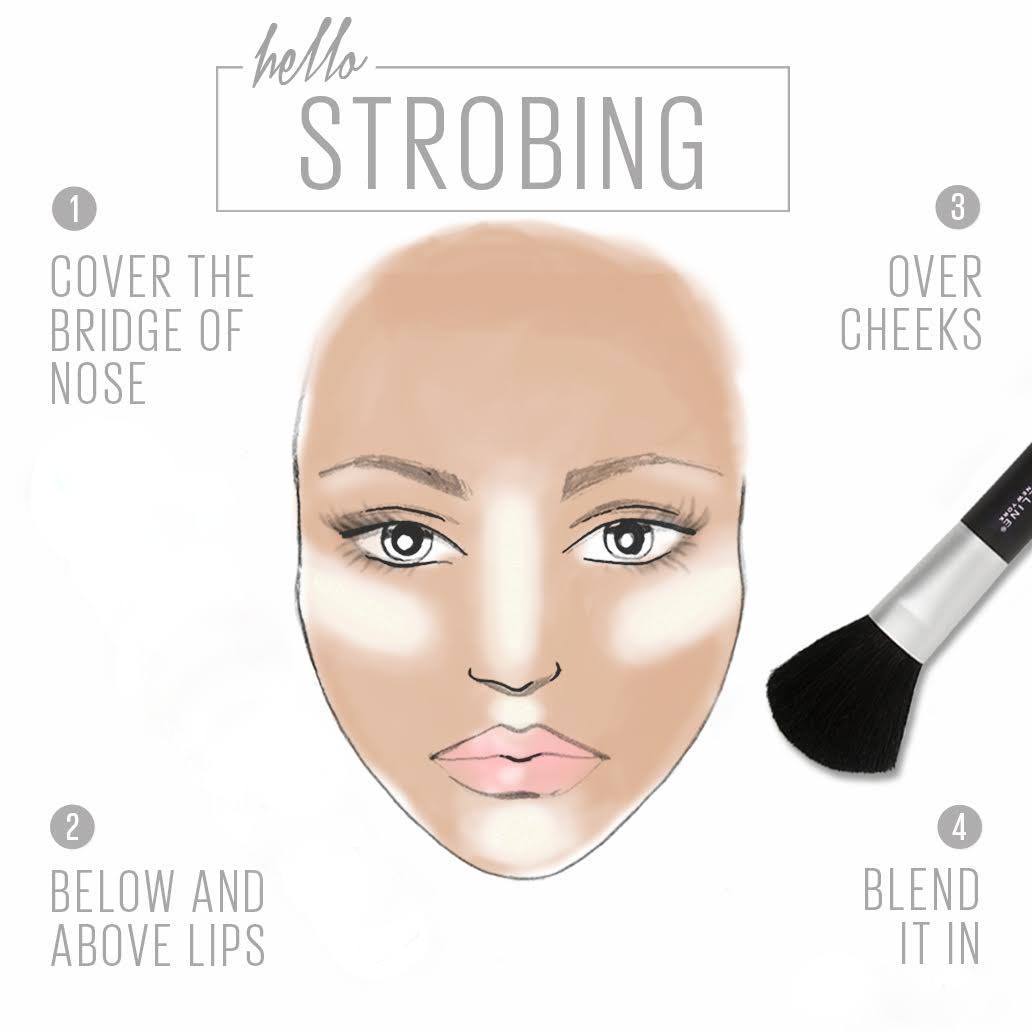
Here are my five steps to create the perfect strobing effect for all face shapes:
Prep
No matter what makeup look you are trying to create, always start with the skin. I am not a big fan of primers, and so I find skincare is the best way to enhance products without clogging the skin with unnecessary product. Invest in a good serum and moisturiser that suits your skin tone and any skin concerns you have and your makeup will be flawless.
For my experience, if you are dry, stay away from anything oil-free. It's crazy how many times I have come across women that have sold the wrong products at beauty counters so do your research before you purchase.
I recommend Vichy LiftActiv Serum 10 Youth Enhancing Serum as it is amazing for all ages and skin types and works especially well on sensitive skin. Apply to a clean face and lock it in with a moisturiser on top. My favourite is Charlotte Tilbury's Magic Cream, smoothing out the skin and brightening the complexion; it works perfectly as a base for any makeup product that is applied on top.
Choosing the best shade for you
Opt for a shade the best matches your skin tone, you can follow the trend but don't just buy any product, especially if you are basing it on how it looks on someone else. If you take into consideration your own skin tone, you will avoid looking overly warm or ashy, remember, what works for one person might not for another.
Fair skin: Opt for champagne tones, try Luna/Pearl Cream Colour Base from MAC and press into high planes of the face using the tips of your fingers.
Light to medium skin: Pinky Champagne tones, try Copacabana Illuminator from Nars or Moonlight from Tom Ford, these are best applied with a fan brush.
Olive skin: Golden tones are best for olive skin tones, try Giorgio Armani fluid sheer in 10 or 13F (mix or wear alone/on top of foundation)
Dark Skin: Terracotta tones are the only ones to go for if you have dark skin, try Film Star Bronze & Glow by Charlotte Tilbury or Taj Mahal Illuminator from NARS
Placement
Lift your features with highlighting alone, yes, we are talking minimal to no contouring for the next couple of seasons. Place product where the light usually catches on the skin, start on the outskirts of the orbital bone and onto the high planes of the cheekbones, continues down the centre of the forehead/nose (if you are more oily skip forehead) and don't forget Cupid's bow to give you a plump & natural pout! Finish by highlighting the inner corner of the eye to accentuate them and also along with the brow bone to lift the eye.
To achieve glossy skin without looking sweaty, the product placement needs to be precise. Be sure to stick to just those areas when applying a highlighter or you will end up looking damp.
Blend, blend, blend
This is by far the most important step, no matter what, blend, blend, blend! If you are using creamy products really work it into the skin by pressing with the tips of your fingers, you want it to almost melt into the skin as this will give a natural finish to the skin.
If you are using powder products, I recommend a fan brush so that the product is deposited evenly and not caked onto the skin, you want to see the true skin tone underneath the highlight and not just an unnatural shine. We want to enhance the beauty that is already there.
How to complete the look
Use matte products to contrast against the glossy skin created by highlighting. Choose either a bright, colourful matte lip or matte blush. For eyes, I feel that a light, nude eye that is essecentuated with lots of dark mascara works best with this look. For the most striking look, keep the colour placement to the lips and cheeks for that pop of wow!
Vicky Hanna Makeup Artist
www.vickyhanna.com
Instagram: @vickyhannamakeup
- Edited by Danielle Farrell